Embrace the rustic allure of a DIY planter with a center post, a unique and eye-catching addition to your outdoor space that exudes both charm and functionality. This project allows you to showcase your love for gardening while adding a touch of vintage appeal. Get ready to create a planter that not only holds your favorite plants but also serves as a focal point in your garden or patio.
Materials You’ll Need:
- Wooden Post: Choose a sturdy and weather-resistant wooden post.
- Rustic Bucket or Container: Opt for a vintage-inspired bucket that complements the rustic theme.
- Potting Soil and Plants: Select plants that thrive in your climate and suit the size of the container.
- Gravel or Stones: For drainage at the bottom of the bucket.
- Drill and Hole Saw Bit: To create a hole in the center of the bucket for the post.
- Screws and Screwdriver: To attach the bucket to the post securely.
Step-by-Step Guide:
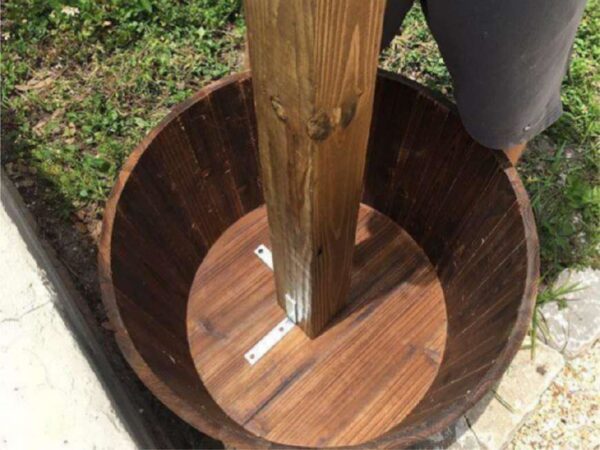
1. Prepare the Post:
- Measure and cut the wooden post to your desired height. The post should be tall enough to hold the bucket at your preferred height.
2. Drill a Hole in the Bucket:
- Using a drill and a hole saw bit, create a hole in the center of the bottom of the bucket. This hole should be just wide enough to fit the wooden post snugly.
3. Add Drainage Layer:
- Place a layer of gravel or stones at the bottom of the bucket. This layer will help with drainage and prevent waterlogged soil.
4. Secure the Post:
- Insert the wooden post through the hole in the bucket’s bottom. Make sure the post is centered and stable.
5. Fill with Soil and Plants:
- Fill the bucket with potting soil, leaving enough space for the plants.
- Carefully plant your chosen flowers, herbs, or greenery in the soil. Arrange them in a pleasing manner.
6. Attach the Bucket:
- Use screws to secure the bucket to the wooden post. Ensure the bucket is firmly attached and won’t wobble.
7. Decorate and Display:
- If desired, add decorative elements such as ribbons, twine, or labels to enhance the rustic aesthetic.
- Place your DIY planter with a center post in your desired location, whether it’s on your porch, patio, or garden.
Maintenance Tips:
- Regularly water and care for the plants to keep them healthy and vibrant.
- Check the stability of the bucket on the post to ensure it remains secure.
Elevate Your Garden’s Appeal: Crafting a rustic planter with a center post is a delightful way to infuse your outdoor space with character and natural beauty. As you bring this DIY project to life, you’ll not only enjoy the act of gardening but also admire the unique visual impact it adds to your surroundings. Whether you’re cultivating colorful flowers, fragrant herbs, or lush greenery, your DIY planter will become a standout piece that showcases your creative spirit and love for all things rustic.
As an Amazon Associate we earn from qualifying purchases through some links in our articles.